Welcome to the Military history of Australia portal!
The RAN Ensign
The flag of Australia
The RAAF Ensign
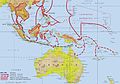
The military history of Australia spans the nation's 230-year modern history, from the early Australian frontier wars between Aboriginal people and Europeans to the ongoing conflicts in Iraq and Afghanistan in the early 21st century. Although this history is short when compared to that of many other nations, Australia has been involved in numerous conflicts and wars, and war and military service have been significant influences on Australian society and national identity, including the Anzac spirit. The relationship between war and Australian society has also been shaped by the enduring themes of Australian strategic culture and the unique security challenges it faces.
The six British colonies in Australia participated in some of Britain's wars of the 19th century. In the early 20th century, as a federated dominion and later as an independent nation, Australia fought in the First World War and Second World War, as well as in the wars in Korea, Malaya, Borneo and Vietnam during the Cold War. In the Post-Vietnam era Australian forces have been involved in numerous international peacekeeping missions, through the United Nations and other agencies, including in the Sinai, Persian Gulf, Rwanda, Somalia, East Timor and the Solomon Islands, as well as many overseas humanitarian relief operations, while more recently they have also fought as part of multi-lateral forces in Iraq and Afghanistan. In total, nearly 103,000 Australians died during these conflicts. (Full article...)
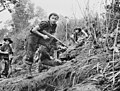
Bruce Steel Kingsbury, VC (8 January 1918 – 29 August 1942) was an Australian soldier of the Second World War. Serving initially in the Middle East, he later gained renown for his actions during the Battle of Isurava, one of many battles forming the Kokoda Track Campaign in the south-east of the island of New Guinea, then part of the Australian Territory of Papua (now Papua New Guinea) . His bravery during the battle was recognised with the Victoria Cross, the highest decoration for gallantry "in the face of the enemy" that can be awarded to members of the British and Commonwealth armed forces. The first serviceman to receive the VC for actions on Australian territory, Kingsbury was a member of the 2/14th Infantry Battalion.
On 29 August 1942, during the Battle of Isurava, Kingsbury was one of the few survivors of a platoon that had been overrun by the Japanese. He immediately volunteered to join a different platoon, which had been ordered to counter-attack. Rushing forward and firing his Bren gun from the hip, he cleared a path through the enemy and inflicted several casualties. Kingsbury was then shot by a sniper and killed instantly. His actions, which delayed the Japanese long enough for the Australians to fortify their positions, were instrumental in saving his battalion's headquarters and he was posthumously awarded the Victoria Cross as a result. (Full article...)
Image 3
Air Marshal Sir Richard Williams
Air MarshalSir Richard Williams, KBE,CB,DSO (3 August 1890 – 7 February 1980), is widely regarded as the "father" of the Royal Australian Air Force (RAAF). He was the first military pilot trained in Australia, and went on to command Australian and British fighter units in World War I. A proponent for air power independent of other branches of the armed services, Williams played a leading role in the establishment of the RAAF and became its first Chief of the Air Staff (CAS) in 1922. He served as CAS for thirteen years over three terms, longer than any other officer.
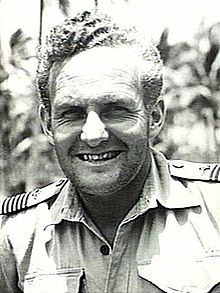
Born in Benalla, Victoria, Waller entered the Royal Australian Naval College aged thirteen. After graduating, he served with the Royal Navy in the closing stages of World War I. Between the wars, he specialised in communications and was posted as signals officer to several British and Australian warships. He gained his first seagoing command in 1937, as captain of the destroyer HMS Brazen. In September 1939, he took command of HMAS Stuart and four other obsolete destroyers that together became known as the "Scrap Iron Flotilla". In 1940, these were augmented by other ships to form the 10th Destroyer Flotilla, supporting Allied troops in North Africa. (Full article...)
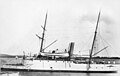
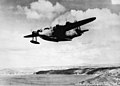
HMS Nairana (/naɪˈrɑːnə/) was a passenger ferry that was requisitioned by the Royal Navy (RN) as a seaplane carrier in 1917. She was laid down in Scotland in 1914 as TSS Nairana for the Australian shipping line Huddart Parker, but construction was suspended after the outbreak of the First World War. Following resumption of work, the ship was launched in 1915, and converted to operate wheeled aircraft from her forward flying-off deck, as well as floatplanes that were lowered into the water. She saw service during the war with the Grand Fleet, and in 1918–19 supported the British intervention in the Russian Civil War.
Nairana was returned to her former owners in 1921 and refitted in her original planned configuration, and spent the next 27 years ferrying passengers and cargo between Tasmania and Melbourne. She was twice struck by rogue waves in Bass Strait, and nearly capsized on both occasions. Nairana was the only Bass Strait ferry not requisitioned for military service in the Second World War, and so became the sole passenger ship with service to Tasmania during the conflict. She was laid up in 1948, wrecked in a storm three years later and scrappedin situ in 1953–54. (Full article...)
Image 6
Air Commodore Cobby (left) and Group Captain Caldwell at Morotai in January 1945 The "Morotai Mutiny" was an incident in April 1945 involving members of the Australian First Tactical Air Force based on the island of Morotai, in the Dutch East Indies. Eight senior pilots, including Australia's leading flying ace, Group Captain Clive Caldwell, tendered their resignations to protest what they perceived as the relegation of Royal Australian Air Force (RAAF) fighter squadrons to strategically unimportant ground attack missions against Japanese positions that had been bypassed in the Allies' "island-hopping" campaign. A government investigation vindicated the "mutineers", and three high-ranking officers at First Tactical Air Force Headquarters, including the commander, Air Commodore Harry Cobby, the Australian Flying Corps' top-scoring ace in World War I, were relieved of their posts.
George Odgers summed up the cause of the incident in the official history of the RAAF in World War II as "the conviction of a group of young leaders that they were engaging in operations that were not militarily justifiable—a conviction widely shared also by many Australian soldiers and political leaders." Odgers concluded that the ensuing inquiry "made it clear that almost everyone concerned acted from the highest motives, and was convinced that, in the crisis, he acted wisely". (Full article...)
Image 7
Captain Roy Phillipps in France, March 1918
Roy Cecil Phillipps, MC& Bar, DFC (1 March 1892 – 21 May 1941) was an Australian fighter ace of World War I. He achieved fifteen victories in aerial combat, four of them in a single action on 12 June 1918. A grazier between the wars, he joined the Royal Australian Air Force (RAAF) in 1940 and was killed in a plane crash the following year.
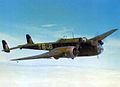
John Raeburn Balmer, OBE,DFC (3 July 1910 – 11 May 1944) was a senior officer and bomber pilot in the Royal Australian Air Force (RAAF). Born in Bendigo, Victoria, he studied law before joining the RAAF as an air cadet in 1932. An instructor at Point Cook from 1935 to 1937, he achieved renown in Air Force circles when he reportedly parachuted from a training aircraft to motivate his pupil to land single-handedly. He also became known to the general public as a cross-country motorist, setting records for trans-Australia and round-Australia trips before World War II.
Australian women were encouraged to contribute to the war effort by joining one of the female branches of the armed forces or participating in the labour force Although most Australian civilians lived far from the front line, the Australian home front during World War II played a significant role in the Allied victory and led to permanent changes to Australian society.
During the war the Government of Australia greatly expanded its powers in order to better direct the war effort, and Australia's industrial and human resources were focused on supporting the Allied armed forces. While there were only a relatively small number of attacks on civilian targets, many Australians feared that the country would be invaded during the early years of the Pacific War. (Full article...)
The CAC CA-25 Winjeel is an Australian-designed and manufactured three-seat training aircraft. Entering service with the Royal Australian Air Force (RAAF) in 1955 as a basic to advanced trainer, it served in this role until 1975. Later, it was used in the Forward Air Control (FAC) role for target marking until 1994, after which it was retired from RAAF service. (Full article...)
British soldiers storming the Eureka stockade in 1854 The following is a list of British Army regiments that served in Australia between 1810 and 1870. From 1788 to 1790, the colony was defended by Royal Marines. From 1790 to 1810 the colony was defended by the New South Wales Corps. From 1810 to 1870, the colony was defended by British Army regiments. The Royal Marines remained in Australia until 1913, after which the Royal Australian Navy was strong enough to take full responsibility for Australian waters.
After the arrival of the First Fleet in 1788, the colony of New South Wales was initially defended by a force of three companies of marines. In 1790 this force was relieved by a specially raised corps, known as the New South Wales Corps, which provided colonial defence until 1810 when they were returned to England following the events of the Rum Rebellion. After this, regular British Army regiments were dispatched to the Australian colonies on a rotational basis, to serve as a colonial garrison for the next 60 years. The first regiment to arrive was the 73rd, who were brought to colony to replace the New South Wales Corps by Lachlan Macquarie. (Full article...)
Image 8
The uniform of the British Marines. Engraving by Joseph Stadler, 1815.
Established in 1786, the Marines saw active service in New South Wales from 1788 to 1792 and was instrumental in establishing the colony's rule of law. Study of the complete New South Wales Marine complement indicates they were chosen from Plymouth and Portsmouth Divisions with only one exception. Beginning with guards arriving with the 2nd and 3rd fleets but officially with the arrival of HMS Gorgon on 22 September 1791 the New South Wales Marines were relieved by a newly formed British Army regiment of foot, the New South Wales Corps. (Full article...)
Image 9
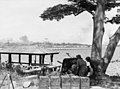
Mounted police engaging Indigenous Australians during the Slaughterhouse Creek clash of 1838
The first conflict took place several months after the landing of the First Fleet in January 1788, and the last conflicts occurred in the early 20th century following the federation of the Australian colonies in 1901, with some occurring as late as 1934. Conflicts occurred in a number of locations across Australia. (Full article...)
In the first and deadliest set of attacks, 242 aircraft hit Darwin on the morning of 19 February 1942. Killing at least 235 people and causing immense damage, the attacks made hundreds of people homeless and resulted in the abandonment of Darwin as a major naval base. (Full article...)
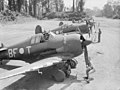
Virgil Paul Brennan, DFC,DFM (6 March 1920 – 13 June 1943), also known as Paul Brennan, was an Australian aviator and flying ace of the Second World War. Enlisting in the Royal Australian Air Force in November 1940, he briefly served in the European Theatre before transferring to Malta. Over the next five months, Brennan was officially credited with the destruction of 10 Axis aircraft from a total of twenty-four operational sorties. Reposted to England, he was assigned as a flying instructor and collaborated in the writing of Spitfires over Malta, a book about his experiences on the island. Returning to Australia in 1943, Brennan was killed in a flying accident at Garbutt, Queensland, in June that year. (Full article...)
Image 2
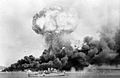
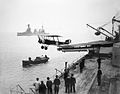
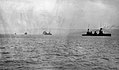
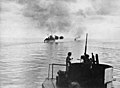
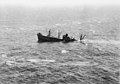
Damaged phosphate cantilever loading equipment following the German bombardment of Nauru on 27 December 1940
Damaged phosphate cantilever loading equipment following the German bombardment of Nauru on 27 December 1940
The German attacks on Nauru refers to the two attacks on Nauru in December 1940. Nauru is an island country in Micronesia, a subregion of Oceania, in the Central Pacific. These attacks were conducted by auxiliary cruisers between 6 and 8 December and on 27 December. The raiders sank five Allied merchant ships and inflicted serious damage on Nauru's economically important phosphate-loading facilities. Despite the significance of the island to the Australian and New Zealand economies, Nauru was not defended and the German force did not suffer any losses.
The two attacks were the most effective operations conducted by German raiders in the Pacific Ocean in World War II. They disrupted supplies of phosphate to Australia, New Zealand and Japan, which reduced agricultural production in these countries. In response, Allied naval vessels were deployed to protect Nauru and nearby Ocean Island and escort shipping in the South Pacific. Small garrisons were also established to protect the two islands. (Full article...)
Image 3
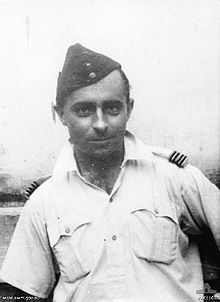
Flight Lieutenant Charles Crombie c.1943
Charles Arbuthnot Crombie, DSO,DFC (16 March 1914 – 26 August 1945) was an Australian aviator and flying ace of the Second World War. Born in Brisbane, he was working as a jackeroo when he enlisted in the Royal Australian Air Force in May 1940. Completing flight training in Australia and Canada, he flew in the European, Mediterranean and Middle East Theatre and South-East Asian theatres, amassing a tally of 12 Axis aircraft shot down, with an additional four probables. In a particular attack on 19 January 1943, Crombie intercepted a formation of four Japanese bombers over India. Despite his aircraft being set alight early in the engagement, he shot down two of the bombers and severely damaged a third before he was forced to bail out. He was awarded the Distinguished Service Order for this action. Returning to Australia late in 1943, he was promoted to squadron leader and posted as a flight instructor with No. 5 Operational Training Unit. Crombie was killed in a flying accident in August 1945. (Full article...)
Image 4
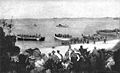
New Zealand troops disembark at Anzac Cove, 25 April 1915
At Gallipoli, the division landed at Anzac Cove on 25 April 1915, coming ashore as follow-on troops to the initial assault force that had made it ashore earlier in the day, and later occupied the northern areas of the Allied lodgement. After the initial Allied assault at Anzac Cove, elements of the division were sent to Cape Helles in early May, where they participated in the Second Battle of Krithia, launching an unsuccessful attack towards the Achi Baba peak. The division's mounted units were sent to Gallipoli in mid-May without their horses, to serve as dismounted infantry, making up for previous losses. Later that month, the division helped repel an Ottoman counter-attack at Anzac Cove, after which it occupied the line until August, when the Allies launched an offensive designed to break the deadlock. During this period, the division attacked Chunuk Bair and Hill 971, and then later Hill 60. These efforts failed, and as winter set in on the peninsula, the division was evacuated from Gallipoli in mid-December 1915 as part of a general Allied withdrawal. (Full article...)
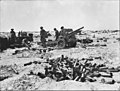
A Matilda tank, named "Clincher", moves towards Japanese strong points near Finschhafen, on 9 November 1943.
The Huon Peninsula campaign was a series of battles fought in north-eastern Papua New Guinea in 1943–1944 during the Second World War. The campaign formed the initial part of an offensive that the Allies launched in the Pacific in late 1943 and resulted in the Japanese being pushed north from Lae to Sio on the northern coast of New Guinea over the course of a four-month period. For the Australians, a significant advantage was gained through the technological edge that Allied industry had achieved over the Japanese by this phase of the war, while the Japanese were hampered by a lack of supplies and reinforcements due to Allied interdiction efforts at sea and in the air.
The campaign was preceded by an amphibious landing by troops from the Australian 9th Division east of Lae on 4 September 1943. This was followed by an advance west along the coast towards the town where they were to link up with 7th Division advancing from Nadzab. Meanwhile, Australian and US forces mounted diversionary attacks around Salamaua. Heavy rain and flooding slowed the 9th Division's advance, which had to cross several rivers along the way. The Japanese rear guard also put up a stiff defence and, as a result, Lae did not fall until 16 September, when troops from the 7th Division entered it ahead of the 9th, and the main body of the Japanese force escaped north. Less than a week later, the Huon Peninsula campaign was opened as the Australians undertook another amphibious landing further east, aimed at capturing Finschhafen. (Full article...)
On 20 October, the US 187th Airborne Regimental Combat Team (187 RCT) staged a parachute assault at Sukchon and Sunchon, about 40 kilometres (25 mi) north of Pyongyang, with the objectives of cutting off KPA forces retreating ahead of the US Eighth Army general advance from the south, capturing important North Korean government officials evacuating Pyongyang, and liberating American prisoners of war (POWs) being moved out of Pyongyang. On 21 October, two 187th Airborne Infantry Regiment (187 ABN) combat teams started southwards in a reconnaissance-in-force to clear the Sukchon–Yongyu highway and rail line and to establish contact with the 27th British Commonwealth Brigade that was leading the Eighth Army advance northwards from Pyongyang. 187 ABN came under fire from the KPA 239th Regiment in the vicinity of Yongyu. As a result of the US airborne operation, the KPA 239th Regiment found itself caught between the Eighth Army advance and the 187 ABN attack in its rear. The KPA 239th Regiment attempted a breakout to the north just after midnight on 21–22 October. Facing determined attacks, the American paratroopers at Yongyu requested armoured assistance from the 27th British Commonwealth Brigade on the Pyongyang–Sukchon road just south of Yongyu. (Full article...)
Image 8
"The Taking of Lone Pine" by Fred Leist, 1921
Detail from The Taking of Lone Pine by Fred Leist, 1921
At Lone Pine, the assaulting force, initially consisting of the Australian 1st Brigade, managed to capture the main trench line from the two Ottoman battalions that were defending the position in the first few hours of the fighting on 6 August. Over the next three days, the fighting continued as the Ottomans brought up reinforcements and launched numerous counterattacks in an attempt to recapture the ground they had lost. As the counterattacks intensified the ANZACs brought up two fresh battalions to reinforce their newly gained line. Finally, on 9 August the Ottomans called off any further attempts and by 10 August offensive action ceased, leaving the Allies in control of the position. Nevertheless, despite the Australian victory, the wider August Offensive of which the attack had been a part failed and a situation of stalemate developed around Lone Pine which lasted until the end of the campaign in December 1915 when Allied troops were evacuated from the peninsula. (Full article...)
Image 9
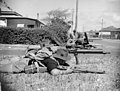
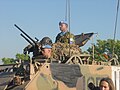
Australian soldiers returning to Bien Hoa airbase following Operation Rolling Stone, late February 1966.
The Battle of Suoi Bong Trang (23–24 February 1966) was an engagement fought between US, Australian and New Zealand forces, and the Viet Cong and North Vietnamese Army during the Vietnam War. The battle occurred during Operation Rolling Stone, an American security operation to protect engineers building a tactically important road in the vicinity of Tan Binh, in central Binh Duong Province, 30 kilometres (19 mi) north-west of Bien Hoa airbase. During the fighting, soldiers from the US 1st Brigade, 1st Infantry Division and the 1st Battalion, Royal Australian Regiment (1 RAR), which had been attached for the operation, fought off a regimental-sized Viet Cong night assault. Repulsed by massed firepower from artillery and tanks, the Viet Cong suffered heavy casualties and were forced to withdraw by morning. After the attack, the Americans and Australians made no attempt to pursue the Viet Cong, focusing on securing the battlefield and evacuating their own casualties. The Viet Cong continued to harass the American sappers with occasional sniper and mortar fire, but these tactics proved ineffective, and the road was completed by 2 March. (Full article...)
Image 15Women friends and family on the wharf waving farewell to the departing troop ship RMS Strathallan carrying the Advance Party of the 6th Division to service overseas. They include George Alan Vasey's wife Jessie Vasey (second from the left). The photograph is especially poignant because Vasey did not survive the war. (from Military history of Australia during World War II)
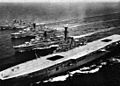
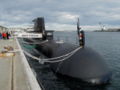
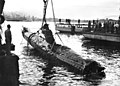
Image 43Australian sailors take possession of a midget submarine at a Japanese naval base near Tokyo in September 1945. (from History of the Royal Australian Navy)
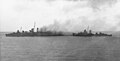
Image 70The light cruiser HMAS Hobart showing torpedo damage inflicted by a Japanese submarine on 20 July 1943. Hobart did not return to service until December 1944. (from History of the Royal Australian Navy)
No. 1 Squadron is a Royal Australian Air Force squadron. The squadron is currently based at RAAF Amberley and operates the F/A-18F Super Hornet multi-role fighter. No. 1 Squadron was established as No. 1 Squadron, Australian Flying Corps at Point Cook, Victoria, on 1 January 1916. During World War I the squadron fought in the Palestine Campaign for the entire war. No. 1 Squadron deployed to Malaya in July 1940. The Squadron suffered severe losses at the hands of the Japanese and was withdrawn to Australia in March 1942 and disbanded. No. 1 Squadron re-formed on 1 December 1943 and served out the war in the Pacific until it was disbanded at Narromine, NSW on 7 August 1946. No. 1 Squadron re-formed as a heavy bomber squadron on 23 February 1948. The squadron was based in Singapore from 1950 to 1958 and flew missions against communist guerrillas during the Malayan Emergency. On returning to Australia in July 1958 the Squadron was re-equipped with the Canberra bombers. The squadron operated F-111s after their belated arrival in 1973 in the low level strike role until they were retired in 2010. In 2017, a detachment of aircraft from the squadron undertook operations in the Middle East.
"Australian troops had, at Milne Bay, inflicted on the Japanese their first undoubted defeat on land. Some of us may forget that, of all the allies, it was the Australians who first broke the invincibility of the Japanese army."